Sorry it took me so long to respond, but for most of this week I was somewhat busy.
It's much better now, but still there are shortcomings.
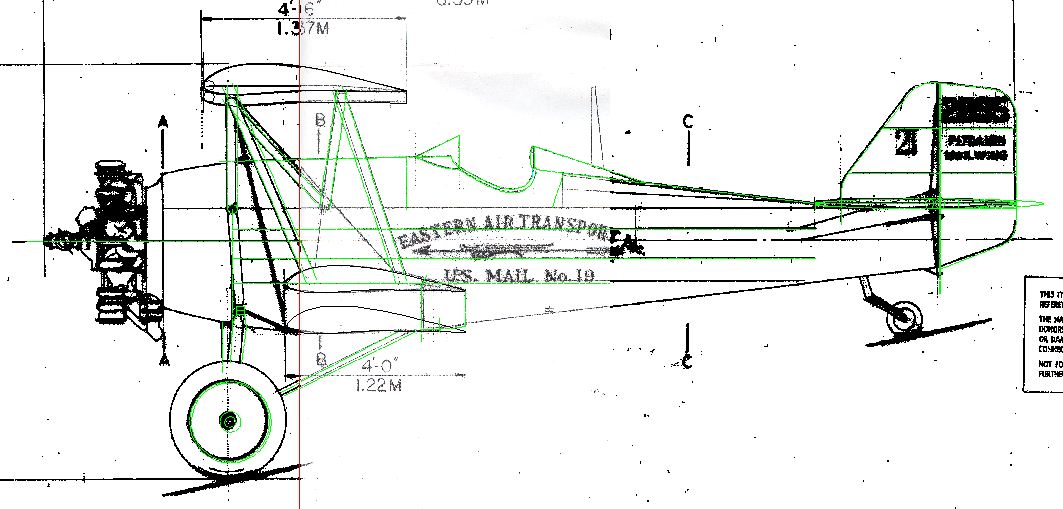
One note: Pitcairn Mailwing was built in a series or around 100 aircraft and in several versions. All my comments (esp. related to accuracy) are taking as reference this particular aircraft (keeping in mind it's probably missing some elements, exhaust for example):
https://www.planespotters.net/photo/713 ... 5-mailwing
1) Close look on the photograph reveals, that leading edge of the horizontal stabilizer is FORWARD of the leading edge of vertical stabilizer (that was reflected on my "sample") whereas on Your drawing it's the other way round. By extension, the tail skid and that small service hatch above it are too much aft.
Also, on some photographs (the "main one", but also this, for example: https://www.jetphotos.com/photo/8815655 ) clearly show that stabilizers are not smoothly integrated with fuselage. (again, I suggest You look closely at my "sample")
2) Trailing edge of the lower wing was not creating one line with bottom of the fuselage, so I suggest You just keep it's bottom contour near the wing as a straight line?
3) Each "section" of this part of the contour is of different length - it would be in the interest of esthetics if You make it more smooth by making each part of same length (or as close to it as possible, if the number of pixels happens to be not easily divisible by number of "sections")
4) Similarly here, but why it's made as such zig-zag instead of just a straight line.
5) You have a heavy corner on the windscreen.
6) I have a problem with that wing strut. Right now it's an arc. Bottom sections are 2-pixel long, Top sections are 3-pixel long. Logical solution would be to make them alternate 2-pixels/3-pixels/2-pixels/3-pixels... I know it can be sometime a tedious work (involving manual copy-paste of each section), but right now it looks... weird. The fuselage-wing strut also suffers by extention (exp. in the top part)
7) The bottom forward contour of the fuselage is a very smooth arc (almost a straight line - in this scale it can be easily represented as such, besides, the undercarriage largely obstructs the view anyway) going diagonally. In Your version there are two horizontal sections with implied "step" somewhere behind undercarriage.
8) I also suggest you rethink that part - You wanted to avoid double black line, but as of now it looks like the fuselage (it's "main" "grey" part) has something like "chin" there - which is clearly not the case. Perhaps manipulating (redrawing or moving apart) the contours of fuselage and of exhaust would help?
Note on the double black lines: In general, they MUST be avoided, but not at ALL cost. Sometimes - rarely, but it happens - they are just unavoidable, for example when several contour lines intersect (at least optically) - like with such wing strut arrangements. In such case, the author should do his (or her, though unfortunately Ladies are very rare here) best to either reasonably alter the contours or make that double line as short as possible. So, if faced by such situation, first try to look if some "black" can't be removed (without making the shape in question look seriously deformed), and if not, then (at least what I'm doing) try to replace some of that black by a VERY dark shade of the actual colour of the element in question) and only leave the double line if it can't be reasonably avoided.
![[ img ]](https://www.dropbox.com/s/2hbs8ws25ciyixv/mailwing5.png?raw=1)
|
![[ img ]](https://www.dropbox.com/s/x3ijvly067jpdhj/mailwing4.png?raw=1)
![[ img ]](https://images-wixmp-ed30a86b8c4ca887773594c2.wixmp.com/f/0e4ae06d-ebec-4f6d-ace1-dfffb17babc2/dczb5a3-fa7ebc72-6cee-4b1f-8107-b431424299a5.png?token=eyJ0eXAiOiJKV1QiLCJhbGciOiJIUzI1NiJ9.eyJzdWIiOiJ1cm46YXBwOjdlMGQxODg5ODIyNjQzNzNhNWYwZDQxNWVhMGQyNmUwIiwiaXNzIjoidXJuOmFwcDo3ZTBkMTg4OTgyMjY0MzczYTVmMGQ0MTVlYTBkMjZlMCIsIm9iaiI6W1t7InBhdGgiOiJcL2ZcLzBlNGFlMDZkLWViZWMtNGY2ZC1hY2UxLWRmZmZiMTdiYWJjMlwvZGN6YjVhMy1mYTdlYmM3Mi02Y2VlLTRiMWYtODEwNy1iNDMxNDI0Mjk5YTUucG5nIn1dXSwiYXVkIjpbInVybjpzZXJ2aWNlOmZpbGUuZG93bmxvYWQiXX0.btTL3LaDJ3yDhuOhoU87oTO57rultYl4Z_uVkgsThZM)
![[ img ]](https://i.ibb.co/P5rrRtS/Pitcairn-PA-5.png)
![[ img ]](https://i.ibb.co/y8xHqxj/Pitcairn-PA-5.png)